Over the last year or so, we’ve been thinking of ways that we could use a Raspberry Pi at work, and looking for a project we could try it out with. One thought we had was a photo booth that staff and students could use to take portrait photos they could use for their VLE profiles.
Looking around the Net, I found Chris’s brilliantly detailed instructions for a photo booth he built, listed at Drumminhands.com, and decided to have a go at adapting it for our use (and also borrow heavily from the structure of his instructions).
The end result, mounted in a box created by our University joiners, looks like this:
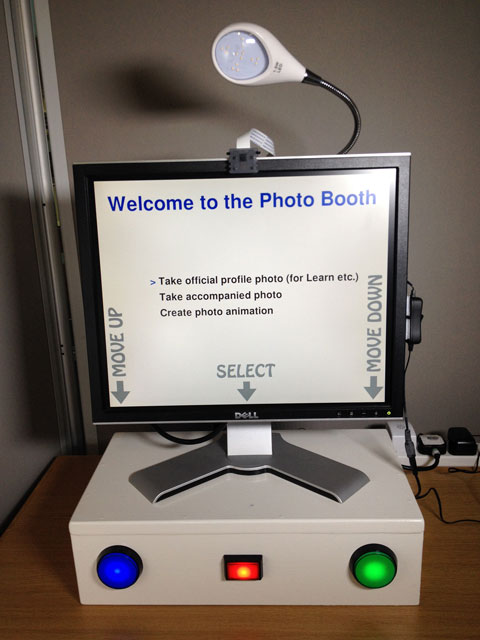

Raspberry Pi Photo Booth by Eoghan Clarkson is licensed under a Creative Commons Attribution-ShareAlike 4.0 International License.
The Plan
The main idea was to have an automated photo booth that staff and students could use to take profile photos. The booth would then resize the photos to the dimensions required by our various VLEs, and provide the user with a personal web adress from where the photos could be downloaded.
In addition, the photo booth could offer separate modes, such as one producing animated gifs that Chris’s photo booth provided.
So the proceedure would be:
- Present the user with a main menu of options, initially:
- Official photo
(the main mode, used for taking profile photos for VLEs) - Accompanied photo
(lets users take a photo with a local landmark superimposed on it) - Animated photo
(takes four photos then builds them into an animated gif, as in the Drumminhands photo booth) - Continuous photos
(continuously takes photos every couple of seconds, meant as a fun activity at events)
- Official photo
- The user interface would consist of three buttons. The buttons would be illuminated to indicate when they are active, and on screen text would indicate each button’s function. On the main menu, the functions would be:
- A button to move up the menu.
- A button to move down the menu.
- A button to select the current menu option.
- A fourth button can be used to both shutdown the Pi (single press), or quit the photo booth application (hold down for a few seconds).
The four modes would be:
Official photo
- An overlay appears on-screen, to show user the area their head should fill.
- A couple of instruction screens appear.
- Four photos are taken at two second intervals.
- All four photos are presented on screen, together with options to ‘accept’ or ‘reject’ them.
- If the user accepts the photos, then:
- They are resized into the various pre-defined sizes.
- They are uploaded to a web server.
- The web address for the images is shown on-screen.
- The user then presses a button to return to the main menu.
- If the user rejects the photos, then return to the main menu.
Accompanied photo
- An image appears on-screen (e.g. a statue) that the user can position themselves beside.
- Four photos are taken at two second intervals.
- All four photos are presented on screen, together with options to ‘accept’ or ‘reject’ them.
- If the user accepts the photos, then:
- They are resized into a pre-defined size.
- They are uploaded to a web server.
- The web address for the images is shown on-screen.
- The user then presses a button to return to the main menu.
- If the user rejects the photos, then return to the main menu.
Animated photo
- Instructions appear on-screen.
- Four photos are taken at two second intervals.
- The photos are converted into an animated gif.
- The animated gif is displayed on the screen.
- The animated gif is uploaded to the server.
- The user can then:
- Press ‘Start’ to create another animated gif.
- Pres ‘Exit’ to return to the main menu.
(* I should have noticed Chris’s experiences with trying to display an animated gif on screen. Instead I tried myself – but ended up just repeatedly showing each individual jpeg photo in turn, as Chris did)
Continuous photo
- Instructions appear on-screen, showing the web address where the photos will be available
- A photo is taken.
- The photo is uploaded to a web server.
- After two seconds, repeat from point 2 above.
- The user can press a button to leave continuous mode, and return to the main menu.
The parts
- Raspberry Pi computer, I used a Pi 2B (Raspberry Pi 3 Model B, ~£27)
- Micro SDHC card, with Micro SDHD to SD adapter (I got a 32 GB Micro SDHC card, Class 10, ~£8; or save a couple of quid if you’ve already got an adapter)
- Power adapter, ~£7 (but I’ve also used an old Samsung phone adapter I got from eBay)
- USB Keyboard and mouse.
- Raspberry Pi camera module, ~£15
- Display screen (I used an old 15-inch DVI flatscreen)
- HDMI to DVI cable (I used a 0.5m HDMI to DVI-D Cable Male/Male, ~£6.50)
- Buttons and cables:
- Two of High Profile 60mm Illuminated Arcade Button, 5V LED, in blue and green ~£2 each
- One Rectangular Illuminated Arcade Button, 5V LED, in red, ~£1.50
- Button for shutdown, ~£1 (I used a microswitch because an order mixup gave me a spare, but should replace with a more suitable button)
- 8 Insulated 4.8mm Crimped Wires in various colours, ~£3 for 10
- 4 Insulated 6.3mm Crimped Wires, ~£3 for 10
- Perma-Proto HAT, ~£5
Extras
- Raspberry Pi 3 comes with built-in WiFi – but if you have an earlier model, then a Wireless USB adaptor can be handy (or just use an Ethernet cable)
- Edimax 2.4 GHz USB 2.0 (EW-7811UN) wireless adaptor, ~£10.50
Edimax 2.4/5 GHz USB 2.0 (EW-7811UTC) wireless adaptor, ~£13.50[Edit: I got the Edimax EW-7811UN working easily, but had trouble with the EW-7811UTC].
- Pi camera board extension cable (457mm, ~£2.50; or cheaper on eBay)
- PiBow Camera Mount, ~£3
- Before getting the soldering iron out, I used a prototyping breadboard to work out the GPIO connections to use:
- Prototyping breadboard, ~£8
- T-Cobbler for breadboard, ~£8
- A few jump wires, ~£5
- Polyester cable sheath (1m long, 15mm wide), ~£2
Finally
- Create a directory on a web host, where the Raspberry Pi can upload its photos and make them available to the user. Note the FTP login details to place in the scripts.
Setting up the Raspberry Pi
I’ve put my standard set-up on the following page:
The Python code
The Code
I used Python 2.x, which was the default on the Noobs install. The code is available on my GitHub photobooth project.
The following code would copy the code into this directory:
- ~/Documents/Python Projects/photobooth
cd ~/Documents/
mkdir "Python Projects"
cd "Python Projects"
git clone https://github.com/eoghan-c/photobooth.git
The scripts create a temporary directory on the Pi to hold the images before uploading them, in:
- ~/photobooth
Editing from a Mac
It was much easier to use my Mac to edit the Pi’s python scripts, than to edit them on the Pi.
I connected to the Pi in two ways:
- Launch the Terminal application on the Mac, and connect to the Pi’s IP address, e.g.:
ssh pi@192.168.0.15
- Use the Mac’s Finder to mount the Pi’s volume:
- Install Netatalk, using the Pi’s Terminal command (a one-time setup):
sudo apt-get install netatalk
- From the Mac Finder’s ‘Go’ menu, select ‘Connect to Server…’
- Enter the Server Address, e.g.:
afp://192.168.0.15
- Click the ‘Connect’ button.
- Enter your Pi’s username and password
- Install Netatalk, using the Pi’s Terminal command (a one-time setup):
The Pi then mounts as a normal volume, and you can edit the code in your favourite editor.
Modules to Install
Before you can run the code, make sure you install the following modules:
Install the Python Imaging Library (PIL) – used for cropping and resizing images:
sudo apt-get install python-imaging
Install GraphicsMagick – used to create the animated GIFs:
sudo apt-get install graphicsmagick
Customisable parts
Photobooth_functions.py script, OfficialPhoto() function
The self.image_defs variable holds an array controlling the dimensions that ‘Official photos’ are resized to.
Each row of the array is in the form:
- Description, image width, image height, image DPI
HTML folder
The HTML folder contains the HTML templates which are uploaded to the server along with the photos, seen when the user goes to download the photos.
Hardware
Variables in the Code
The variables defined for the hardware in config.py are (note in this project I used GPIO.BCM so the ‘GPIO PIN’ column refers to the BCM numbers):
| Variable | Description | GPIO Pin |
|---|---|---|
| led_pin_select | The LED of the ‘Select’ button | GPIO 18 |
| button_pin_select | The close terminal of the ‘Select’ button’s microswitch | GPIO 23 |
| led_pin_left | The LED of the ‘Left’ button | GPIO 17 |
| button_pin_left | The close terminal of the ‘Left’ button’s microswitch | GPIO 27 |
| led_pin_right | The LED of the ‘Right’ button | GPIO 16 |
| button_pin_right | The close terminal of the ‘Right’ button’s microswitch | GPIO 20 |
| button_pin_exit | The close ternimal of the ‘Exit’ button’s microswitch | GPIO 5 |
| The other terminals of the buttons and LEDs | Ground |
Fritzing Diagram
The buttons I bought contained 5V LEDs, so I didn’t need to use diodes.
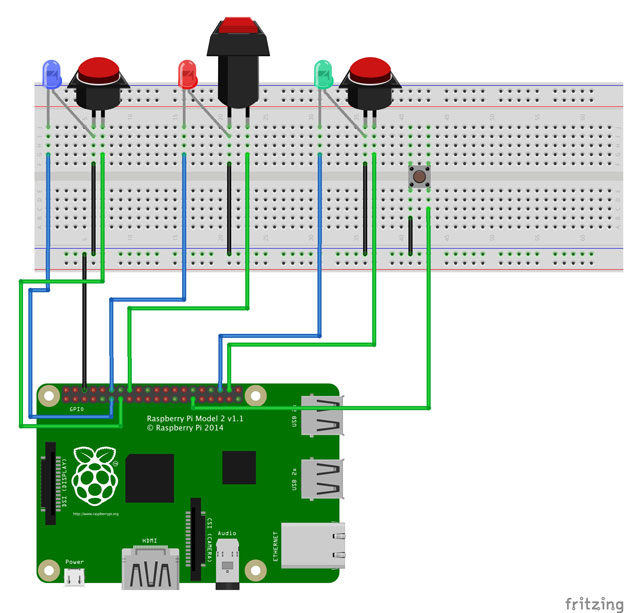
You can also download the Fitzing wiring diagram.
Soldering
I worked out the wiring for the buttons and LEDs on a prototyping breadboard, together with the length of wires needed. Then soldered them into the perma-proto HAT (badly).

Auto-run the Python script
I used systemd, as detailed by Matt in How To Autorun A Python Script On Boot Using systemd
(though ‘Type=simple’ seemed to work for my script).
I’ve included the Unit file with the program files, and you can use it if you have installed the scripts into the directory I used):
- Copy the Unit file into the correct location by using:
sudo cp "/home/pi/Documents/Python Projects/photobooth/photobooth.service" /lib/systemd/system/
- Then refresh the daemon with:
sudo systemctl daemon-reload
- And tell systemd to start the service during the boot sequence, with:
sudo systemctl enable photobooth.service
- Reboot the Pi:
sudo shutdown -r now
- And after rebooting, the Pi should automatically launch the blood_pressure scripts.
The following commands are useful to get the status, or stop the service:
sudo systemctl status photobooth.service
sudo systemctl stop photobooth.service
The above should create a Unit file at /lib/systemd/system/blood_pressure.service containing:
[Unit]
Description=A Photo Booth. Instructions at http://eoghan.me.uk/notes/2016/03/28/photo-booth/
After=multi-user.target

[Service]
Type=simple
ExecStart=/usr/bin/python "~/Documents/Python Projects/blood_pressure/main.py"
Restart=on-abort
User=root

[Install]
WantedBy=multi-user.target
Improvements
Camera Position
I put the camera module on top of the display screen – but, because the default camera module lens has a short focal length, you have to be close to the camera to fill the frame if you want a portrait photo. As the camera is placed on top of the screen, you then have to look up a bit awkwardly if you want to look into the camera.
It would be good to find a lens for the camera module that could narrow the angle of view, and allow the user to sit further way from the camera.
Lighting
I bought an LED Clip Light (£30) to stick on top of the flatscreen, that the user could switch on and off – but this doesn’t provide enough light. I think that Kevin Osborn’s idea to use LED strips as a flash might be worth a try.
Image Overlays
I displayed images on the screen using pygame.Surface with a surface alpha value – but this doesn’t allow different parts of the image to be displayed with different transparencies. So the overlay showing where to put your face in the ‘Official photo’ mode isn’t completely transparent in the centre, and darkens the whole image.
It may be better to try using per pixel alphas instead, although the documentation notes that this is the slowest drawing mode.
Also, the some image overlays are optimised for the display screen size and shape, and might not display well on a different display screen.
Customisable Variables
Move all the main customisable variables into config.py
