Note: This NFC project uses a Raspberry Pi 2 Model B, and the proceedure may be different to connect RC522 RFID readers to older Raspberry Pis. This is also a work in progress, and these notes are not yet complete.
A few friends from work and I are taking part in a sponsored climb, six of us climbing the height of the U.K. three peaks (11,180ft) between us on an indoor climbing wall over six hours. One part of our preparation is working out how we’re going to keep track of the height we have climbed as we go up and down an 8m wall.
What if each of us had an NFC tag on our wrists which we could tap on an NFC reader at the top of the wall? (Or might be safer to tap when we were safely back on the ground.) A slight complication is that there are two heights of wall we might climb, 8m and 6m – so we could have two NFC readers to tap, one for each wall height. This sounded like a nice Raspberry Pi project.

Looking on the Net, I first found an Attendance system using Raspberry Pi and NFC Tag reader by Yim which seemed a good place to start.
The plan
The plan would be something like this:
- A Raspberry Pi with two NFC sensors would be set up at the bottom of the climbing walls (somehow safely out of the way of climbers and belayers). One sensor would have a notice on it saying “8m”, the other one saying “6m”
- Each climber would have a wristband with an NFC tag attached to it.
- After reaching the top of the wall, and abseiling back down, each climber would tap their wrist tag on the sensor for the height of the wall they had just climbed.
- The Raspberry Pi would determine which sensor had been tapped by which tag (i.e. what height wall had been climbed by which climber).
- The Pi would sound a buzzer and/or light up an LED to indicate a successful read.
- The Pi would then update a MySQL database on a web host with the wall height and climber ID.
- A simple PHP script would read the MySQL database, and display a running total of the height left to climb, so people could follow us live online.
This application would only need to read the ID of the tags, so it wouldn’t read or write data to them – though that could be an idea for an improvement.
Bearing in Mind
I expect I would need to wait a few seconds after a successful read before accepting another reading from the same tag/climber, so we don’t accidentally record multiple ascents for the same climber if they leave their tag in contact with the reader for a couple of seconds.
Updated plan
The original idea was to update a MySQL DB on an external webserver, so the data was safely off the Pi in case it crashed.
But my web server won’t allow an external device to write to its MySQL databases unless the external device’s IP address is registered (see Troubleshooting section below). However, running the Raspberry Pi off the eduroam WiFi network, we can’t get a static IP address for the Pi, nor can we be sure what the external IP address would be. So even if we did register the IP address it was using on eduroam, we couldn’t be sure the Pi would continue using that same IP address, and might find my web server blocks it from writing to its MySQL DBs.
So the new plan was to was to install Apache, PHP and MySQL on the Pi, and write to the Pi’s own DB.
But, because of the same problem knowing the Pi’s IP address on eduroam, our friends outside wouldn’t be able to connect to it to view our progress.
So the final plan was to write to the Pi’s own MySQL DB, use PHP on the Pi to build the web page (drawing on the info in the DB) – then copy that completed web page onto my web server.
This proved a good system, because the Pi periodically lost it’s WiFi connection, but the info was still being collected on the Pi, and could be uploaded to the web server when the WiFi connection picked up again.f
The parts
- Raspberry Pi computer, I used a Pi 2B (Raspberry Pi 3 Model B, ~£27)
- Micro SDHC card, with Micro SDHD to SD adapter (I got a 32 GB Micro SDHC card, Class 10, ~£8; or save a couple of quid if you’ve already got an adapter)
- Power adapter, ~£7 (but I’ve also used an old Samsung phone adapter I got from eBay)
- USB Keyboard and mouse.
- Mifare RFID Reader and tags (I got a set of three RFID RC522 readers and tags from eBay, ~£10)
- Some 1k Mifare silicone wristbands, £18 for ten.
- A couple of long ribbon cables, so the RFID readers could be spread out from the Raspberry Pi.
- Display screen (I used an old 15-inch DVI flatscreen)
- HDMI to DVI cable (I used a 0.5m HDMI to DVI-D Cable Male/Male, ~£6.50)
- Perma-Proto HAT, ~£5
UART, SPI, I2C?
Only after buying my RFID readers did I notice posts about the different interfaces they support – UART, SPI, I2C. There was also a post (by FLYFISH TECHNOLOGIES » Tue May 06, 2014 11:34 pm) saying that different readers were hard wired to use just one of the three interfaces.
My original idea was that as we’d have three people climbing at any one time, they could have an NFC reader each. Reading a little about the different interfaces, it seemd I2C would be ideal – but it looks like the readers I bought had SPI interfaces which the Pi only has (easy) support for two readers. Luckily I think I can get away with two readers, shared between climbers, depending on the height of the wall they are climbing.
Setting up the Raspberry Pi
When it comes to attaching an RC522 reader to a Raspberry Pi, many people link back to Mario’s seminal Utilizando el lector NFC RC522 en la Raspberry Pi (online translators help when my Spanish fails).
Sparkfun’s Raspberry Pi SPI and I2C Tutorial provides lots of info about the different protocols.
The set up I went through was:
- I start with my standard set up instructions (this project didn’t need the camera module set up).
- Enable the SPI interface – from the ‘Raspberry Pi Configuration’ window, click the ‘Interfaces’ tab, and set SPI to ‘Enabled’. Click ‘Ok’ and reboot.
- Check the SPI interface is recognised:
ls /dev/spi*
This should return ‘/dev/spidev0.0 /dev/spidev0.1’
- A few forums and online info say the /boot/config.txt file needs to have the device tree explicity switched on. My tags wouldn’t scan until I did the following:
- Add the following line to the file:
device_tree=on
- Reboot the Pi.
- Add the following line to the file:
- Install the Pi-SpiDev library:
sudo apt-get install python-dev

cd ~
git clone https://github.com/lthiery/SPI-Py
cd SPI-Py
sudo python setup.py install
- Install MySQLdb to allow the scripts to a MySQL database:
sudo apt-get install python-mysqldb
- Install the Unidecode library (Yim included this in his instructable to handle Central European characters, so it’s useful to keep in):
sudo apt-get install python-unidecode
- To install Apache, MySQL and PHP, I followed Ste Wright’s detailed instructions at:
- And I needed to install the PHP extensions mbstring and gettext to get the PhpMyAdmin page to load:
sudo apt-get install php7.0-mbstring
sudo apt-get install php-gettext

sudo /etc/init.d/apache2 restart
- The mysql.sql script should be able to set up the MySQL DB.
- Entered the name, surname & tag ID into the people table of the database.
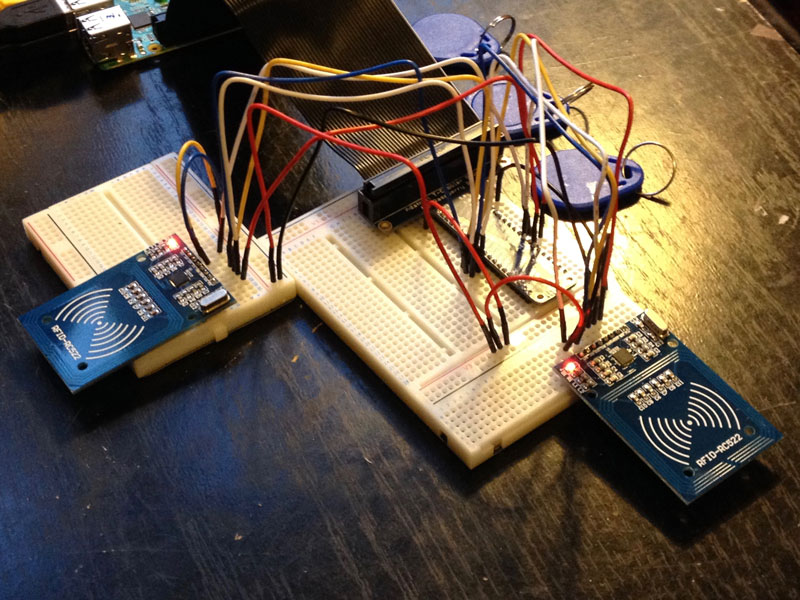
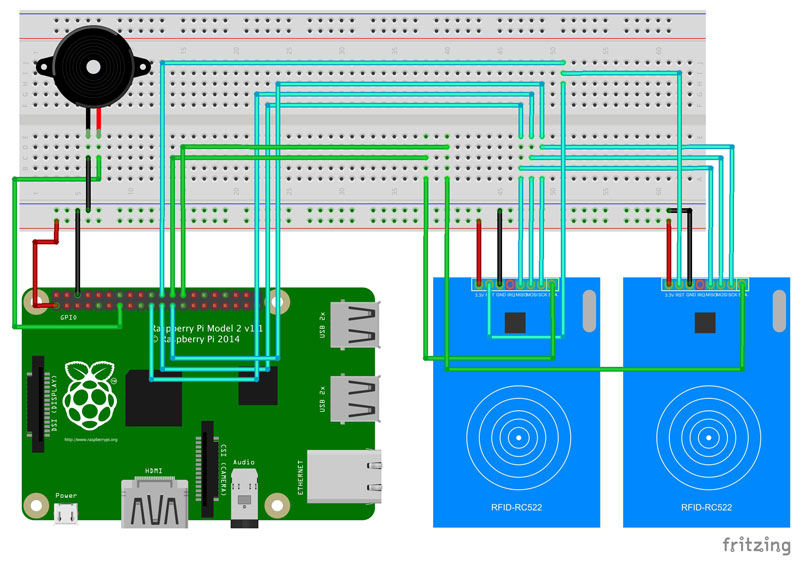
The hardware
This project uses GPIO.BOARD, but the GPIO pins column lists the BCM numbers, because it was easier to wire them up with the T-Cobbler when testing.
| GPIO Pins | First RC522 | Second RC522 |
|---|---|---|
| 3V3 | 3.3V | 3.3V |
| GND | GND | GND |
| GPIO 25 | RST | RST |
| MOSI | MOSI | MOSI |
| MISO | MISO | MISO |
| SCLK | SCK | SCK |
| CE0 | SDA | – |
| CE1 | – | SDA |
| Green LEDs | ||
| GND | Negative leg | Negative leg |
| GPIO 4 | Positive leg | – |
| GPIO 17 | – | Positive leg |
| Red LEDs | ||
| GND | Negative leg | Negative leg |
| GPIO 27 | Positive leg | – |
| GPIO 22 | – | Positive leg |
| Buzzers | ||
| GND | Negative leg | Negative leg |
| GPIO 18 | Positive leg | – |
| GPIO 24 | – | Positive leg |
The Python code
I’ve based my code on MFRC522-python code by mxgxw, and adapted it to use two RFID readers. At the moment the code continually switches the SPI master between the two readers, polling them for chip reads – which probably isn’t the most efficient way to do things (if anyone who understands the SPI interface and Raspberry Pi can suggest a better way, or a different interface, then I’d be very interested). But as my application doesn’t have to do anything but log chip reads, then it will probably manage Ok.
I also noticed that the chip IDs read in by the code can sometimes be corrupted – for my purposes, I’ve just hardcoded the chip IDs into the python script, and only log a read if it matches one of those IDs (again, not very efficient, and it would be great to improve it).
- Set up a directory on your Pi for the project – I usually create a ‘Python Projects’ directory in ‘Documents’:
mkdir ~/Documents/Python\ Projects
cd ~/Documents/Python\ Projects
- Get the source code for this project from the GitHub repository:
git clone https://github.com/eoghan-c/team_track.git
- Copy the HTML file and PHP script so they can be served by the Pi’s webserver:
sudo cp ~/Documents/Python\ Projects/team_track/scripts/* /var/www/html
Troubleshooting
As probably many others do, my web host’s security required me to register my Raspberry Pi’s external IP address with them before my python scripts could write to my MySQL DB on their servers. This took a little messing around to get working (especially as the IP address they say on that page that we need to connect to doesn’t seem to be the correct one!). I could use the Pi as a web host and database server, but when it’s connected to the University’s eduroam on the day, that wouldn’t allow external people to view the progress page.
Auto-run the script on boot
I used systemd, as detailed by Matt in How To Autorun A Python Script On Boot Using systemd
(though ‘Type=simple’ seemed to work for my script).
My Unit file at /lib/systemd/system/team_track.service contained:
[Unit]
Description=Track our team's climbing progress using NFC tags
After=multi-user.target

[Service]
Type=simple
ExecStart=/usr/bin/python "/home/pi/Documents/Python Projects/team_track/team_track.py"
Restart=on-abort
User=root

[Install]
WantedBy=multi-user.target
After refreshing the daemon with sudo systemctl daemon-reload I told systemd to start the service during the boot sequence, with:
sudo systemctl enable team_track.service
The following commands are useful to get the status, or stop the service:
sudo systemctl status team_track.service
sudo systemctl stop team_track.service
Limitations
Hardcoded info
As usual, this was a very rushed project. A lot of information hardcoded into the Python scripts could be handled better – e.g.:
- The tag IDs are listed in the chip_uids variable in team_track.py script, but are also are entered into the people table of the MySQL DB.
- The target height of our combined climb is listed in scripts/content.php script, in the $target_height variable – might be better to have is in a separate MySQL table?
- The SQL database, user and password are in variables at the top of the scripts/content.php script.
- The SQL database, user and password are also added in the Connect() function of the mysql.py script.
- As I couldn’t get a static address for the Raspberry Pi, the get_ip_addr.py script posted the Raspberry Pi’s current IP address to a ip.html page on an external server.
- The remote_account variable was hardcoded with the user & server address of the server (e.g. ‘myuser@123.45.0.6’).
- remote_file_dir held the path to the directory to write to.
- remote_url_prefix held the URL to the ip.html page.
Improvements
Storing some data on the tags themselves could be an idea, maybe have the names of the people on the tag instead of listed in the people table of the MySQL DB (but maybe that wouldn’t simplify things after all, especially as I seem to get data corruption when reading the tags).
The final result
In the end the area roped off for our challenge only contained 8m walls – so we set both NFC readers to register 8m, instead of one for 8m and one for 6m.
While we climbed, this webpage displayed our running total (where it stays, frozen in time).

Hi!
Would you mind sharing your source code on GitHub?
Many thanks for an inspiring blog post!
David
Hi David,
Sorry about that – I meant to remove hardcoded login details etc from the code before uploading, but never got back to it. I’ve now put the source on GitHub (details in the ‘The Python Code’ section), and have added some more info into sections above (particularly the ‘Hardcoded info’ section). I’m not sure the code is very robust, but hopefully it’s enough to start.
Cheers,
Eoghan